Translate

Thursday, December 4, 2014

Merry Christmas Charlie Brown!

This year for Christmas I got a new job at the School District (actually I started back in September, but whatever)!  One of the fun things they do is have a holiday door decorating contest for everyone in the building.  My office is one of the smaller ones (only 4 people) and our department has a long history of doing very bad with this particular contest.  Apparently they've been putting up the same snowman and Santa window clings for years!  Good thing I'm here now :).  Here is the first official entry of the Superintendent's Office EVER!

This is all made from cut paper that I layered and glued together. That is my new desk in the center.


One of the special features of our door is that it is double sided so we can enjoy it from the inside too.  Once I got everything up my co-workers got into the spirit of things and embellished with some lyrics that are only visible from inside the office...


Here is one final, although misleading view. This is with the main doors shut so the characters that appear in the hallway are duplicated in the center and looking at each other, but if you can ignore that, I think it creates a fun visual to see an uninterrupted line up of Peanuts carolers.  With the door shut you can also see what I hope will catch on as a new holiday greeting :).

HOLIPY CHARLIE BROWN!!!


12/18/14 UPDATE:
Today the internal voting ended for door decorating contest and the winners were announced.
The grand prize went to...

<insert drum roll here>

ASSESSMENT!!!!!  Wait, what?

That's right, we didn't win, but we did come in second place, which I don't think is half bad considering this is the first year that my office even tried to be in the running.  Here are some shots of the winning door.

This is a corner office and the way the hallway bends makes it impossible to get a shot of the full door at once, plus so much of their effort was in the little detail that is hard to read from an overview shot.
Ya gotta love Luke's attempt at the intergalactic ugly sweater contest :).


I think in the end, the contest results came down to one simple question.  Does our building have more Star Wars fans or more Peanuts fans?  The fans have spoken.  It's all good though.  I'm happy with our door and our office has already come up with a theme idea for next year sure to claim first place...  "The Superintendent's Office Strikes Back."

Sunday, October 5, 2014

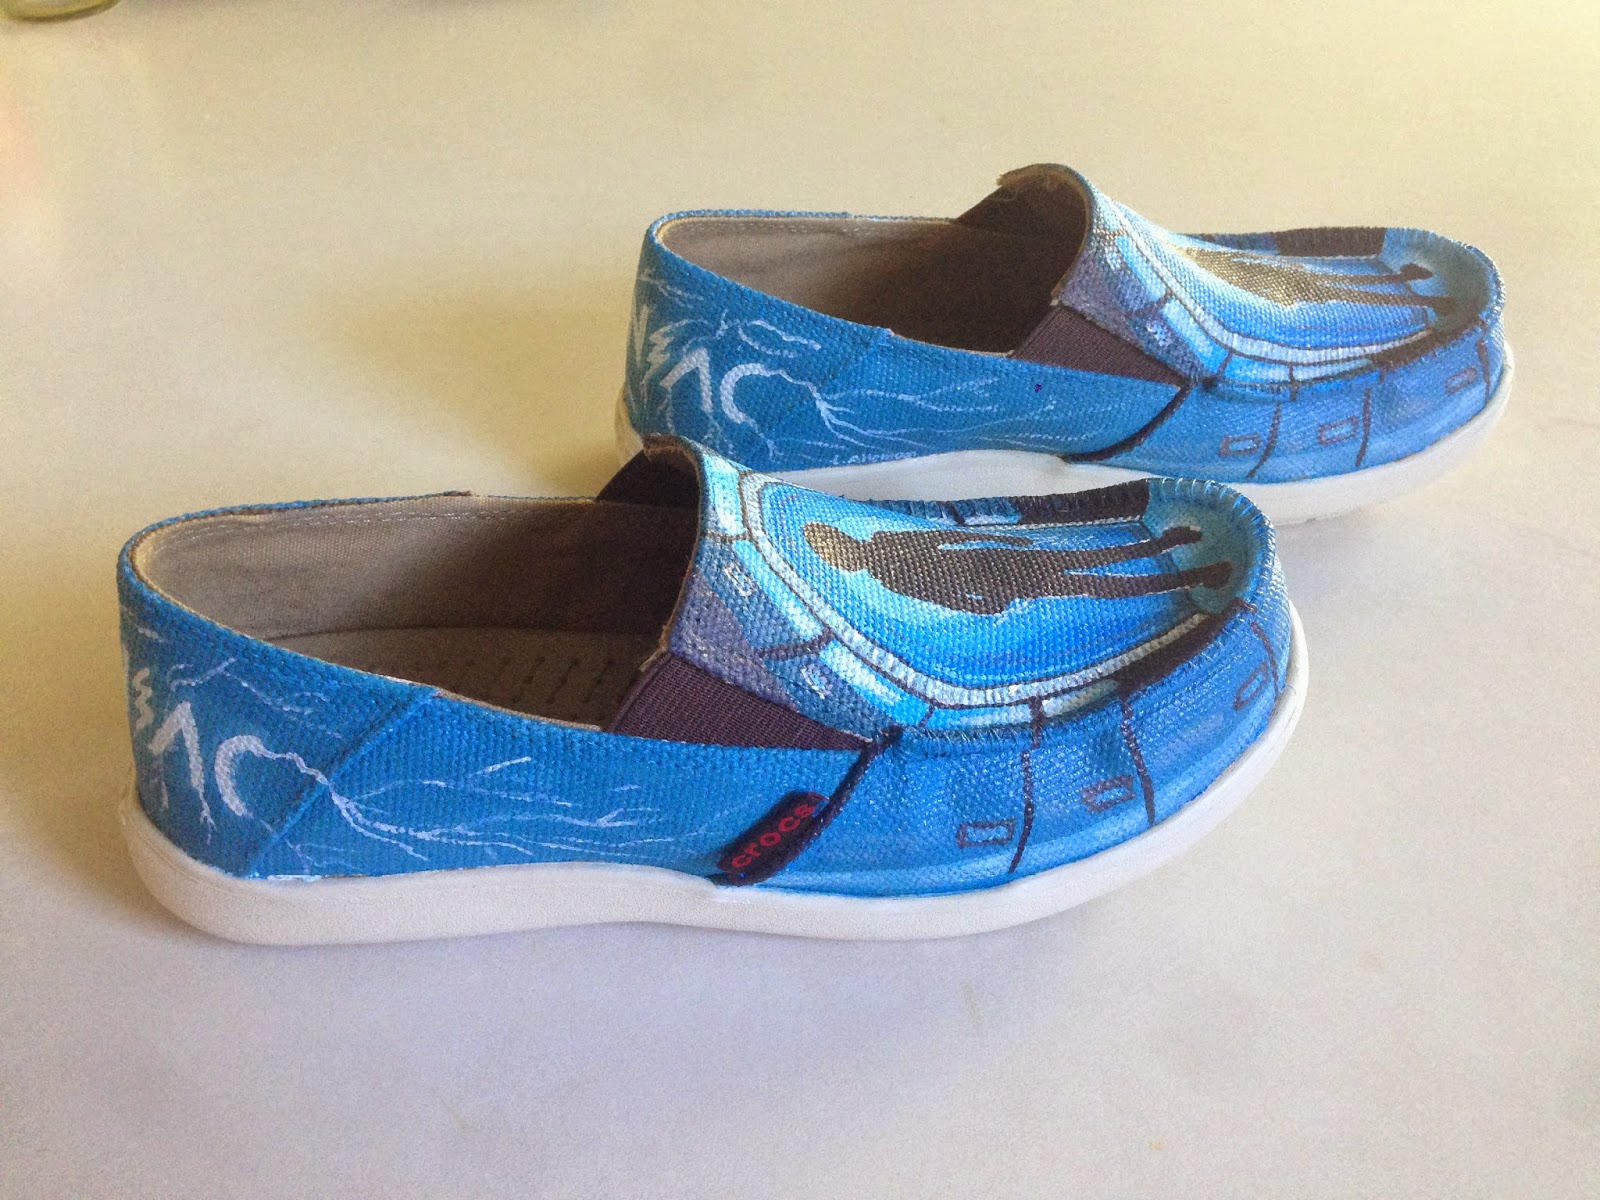
Michael Vey Shoes

These are the Back to School shoes that I painted for my nephew who picked out his own shoes online this year, but when they came in the mail he decided he didn't like the color and, since they were non returnable, he asked if I could "just paint them black."  Nope.  I couldn't :).


If you don't recognize the design, it's based on the book series Michael Vey by Richard Paul Evans.  You can learn more about it here.  My 11 year old nephew has gotten really into the series and has read all 4 books just since school started 5 weeks ago (they are not small books either).  This is the first thing that has sparked an interest in reading and has turned him into an avid reader.  He now can't get enough which I'm super thrilled about.

To paint the shoes I first took this before picture :)


Then used painters tape to cover anything I didn't want painted.  Since the shoes were canvas, I just treated them like canvas and first primed them with two coats of gesso. I thinned down the gesso with a product that I bought from a local art store to convert any acrylic paint into a fabric paint that can then be heat set for durability.  (I was worried about the shoes getting too stiff so I just started making up my own rules about what could get mixed with what in order to maintain flexibility).  Once the primer was dry I transferred my drawings onto the shoes.


I then mixed 1:1 fabric paint enhancer in with my regular acrylics and painted the shoes like I would any canvas.  When I was done, I let them dry overnight, then used a hair dryer to heat set the paint for about 20 minutes. I thought the results turned out pretty well, but I'll have to get back to you at the end of the school year to report on the wear and tear of this project.

Here are some pictures of the shoes being initiated at the park:


I think he likes them!

Tuesday, April 1, 2014

Temple Through the Trees

I was asked to paint a picture of the Salt Lake Temple for an auction that the youth group at my church is going to have this week to raise money for summer camp.  In fact, you can see a picture of the cute girl who asked me to do it here.  How could I say no to that face, right?

Here is how it turned out.

"Temple through the Trees"
16" x 20" acrylic on canvas
I chose this particular view of the back side of the Salt Lake Temple for it's simplicity because it didn't have as many windows as the front and the famous Angel Moroni isn't visible, so I wouldn't have to paint that either, thinking that would make it easier since I was doing this on a short timeline; however, I was quickly reminded that simplicity doesn't necessarily have as much to do with details like windows, and that something as "simple" as angles and perspective can quickly complicate a simple painting. For as plain as the finished project seems, getting the lines for all of those spires going the right direction and with the right perspective was a huge pain!  In the end, I had to settle for close enough as there is no way that all of them are going the completely right direction and in several places the perspective is totally off.  I can pretty confidently say that there is not one straight line in this entire painting, and there are no right angles either, but the overall effect works so I'm happy with the finished project.  My favorite part of it ended up being the flag (it was my favorite part of the original photograph too, which was really why I took the picture from this angle in the first place a few years ago).  The biggest compliment I got about it however, came from my 10 year old nephew who said "I wish we could keep it."  I thought is was sweet that he liked it enough that he didn't want me to give it away.

In addition to this being my first ever painting of a building (unless you count the Superman mural, which I don't because the buildings there are just blocks of color, with no perspective, and they are not the main subject of the painting), this painting marks another first for me.  This is the first painting I've ever done that received revisions based on advice I received from a professional artist about the specific piece I was working on (as opposed to just advice in general).

I had the privilege yesterday of meeting Anne Marie Oborn, who is a well known local artist and has painted many religious pieces including this one which is rather famous in the LDS community:


It was a very serendipitous meeting and we began talking about religious art as she was showing me some of her temple paintings.  I couldn't resist telling her that I had just completed my first temple painting and showed her a picture of it on my phone.  She visited with me for about an hour and gave me some pointers about color, particularly in the trees and took me into her studio to show me her palate and how she likes to mix colors.  She gave me a handwritten "shopping list" of her favorite paints to use and mix and told me to go experiment.  I haven't bought any new paints yet, but I did follow her advice (as best as I could) about the trees on my temple painting and made some adjustments to the color before declaring it finished.  It was such a thrill for me to get to visit with her in her home and talk to her about art and have her give me advice. It isn't at all what I was expecting when I knocked on her door to pick up an art donation she was making to the non-profit that I work for, but it was a fun afternoon that I'm not likely to soon forget.

Thursday, January 2, 2014

Max and Sam

A co-worker of mine asked me to paint Gary Squares of her kids last summer.  I got them started right away, but life always seems to get too busy and this project quickly fell to the back burner.  As part of a New Year's Resolution I made to dedicate more time to art and personal improvement I decided to spend part of my day off of work yesterday finishing them up.


I gave them to my co-worker today and she seemed thrilled with the final result.  That makes me happy.


These are the original photos I had to work with.

"Max"
16"x20" acrylic on canvas

"Sam"
16"x20" acrylic on canvas
My last Gary Square portrait  prompted the idea to improve my portrait skills by attempting to paint 100 faces.  If anyone is counting, these make numbers 3 and 4.  Only 96 more to go :).

Just as I side note, my favorite square on "Max" is the one that is third down from the top and second over from the left containing a little hair line and forehead, and my favorite square on "Sam" is the bottom left corner of the jacket.

Wednesday, December 25, 2013

Christmas Kitties

A few years ago I drew these portraits of our cats as a Christmas present for Kristin, but since we've added 3 new cats to our household the set was now incomplete.  This was her Christmas present this year.

Mo (the tabby), and Trouble (the white cat) are best friends. They like to sleep in a little kitty pile and lick each other  Hellie (the black and white cat) is more of a loner, but she was my Mom's oldest and favorite cat.

"Granny's Cats"
8"x10" oil pastels and colored pencils on watercolor paper

Tuesday, December 10, 2013

Auntie Claws

Well... tis the season.  Time to send out Christmas cards, which is something I've never actually done before  (I know, I suck).  This year, I decided to correct this horrible transgression by diving in head first and sending cards to everyone I know.  Kristin and I teamed up to come up with a Christmas Card idea that we thought reflected our lives and I drew our very first ever custom Christmas Card.

Isn't our little household cute?
This is me on the left with Kristin on the right in Santa hats with our 6 cats pulling the sleigh.  The cats are Annie (front left), Hellie (front right), Sparks (middle left), Mo (Middle right), Kitka (back left), and Trouble (back right).  Our Angel Sooty who died a few year's ago is pictured on the sleigh and I'm wearing a purple ribbon to remember my mom.

A little Photoshop magic turned the image into this for the final product.

Front

back

We took a big risk confirming ourselves as Crazy Cat Ladies to everyone, but hey, we hang up all the pictures we get of everyone's kids screaming on Santa's lap, so they can hang up our little brood too right?
Besides, to people who know us well this won't come as any surprise.

Merry Christmas!

UPDATE (12/30/31):
Well, our first ever Christmas card effort was a success and we sent out over 100 cards!  We got many responses back from various people commenting on the card and saying how much they liked it which was really fun for me.  The best feedback however came from Kristin's 8 year old niece Arianna.  According to her mom she said that it was the best card she'd ever seen and even practiced drawing it herself.  Imitation really is the best flattery. I was honored!  Here is a picture that this little future artist drew of herself driving her own kitty sleigh.


Arianna's Sleigh
by Arianna Anderson, age 8
Nice job Arianna!  I LOVE your picture and can't wait to see more of your art work!  

Thursday, October 31, 2013

Happy Halloween!

I decided that I would try again to muster up some Halloween spirit by painting a fun, festive image on our front window.  Last year's window introduced the world to the addition of our 3 new family members and I thought it was fun, so I decided to keep up the tradition by painting our 6 cats out playing in the pumpkin patch.  No people got represented this year, but let's face it, our lives are all about the cats anyway, so this is still pretty accurate :).


We also have a big family Halloween party that we host each year with soup, games, pumpkin carving, etc. and this the piñata that I made for the kids.  It was a pretty fast DIY project.  Al you need is a shoebox, an empty toilet paper roll, some colored paper and a black marker.  The kids loved it!

I feel like I should get some bonus decorating points for how amazing the fall colors in our back yard were during the party.


And... last, but not least, here is a little holiday update on the whole minion hat thing....

Riley, the kid who started it all dressed as a minion with his teacher dressed as Gru.

Me and Riley dressed as minions, with Kristin supporting the Day of the Dead.  Oddly enough, that was her required costume for work on Halloween and the face paint was done by a co-worker, so she didn't get to wear her minion hat.

Kristin's work goes all out for Halloween and each department decorates to a theme.  The décor in their area was pretty awesome!
I even helped by making the flags that hang above the alter.


If you look close you'll see that the yellow flags have skulls, the red flags say "DEAD" and the blue flags have pumpkins cut out.  It's kind of hard to see the blue with the black background, but the overall effect works.


Now... back to the minions :).
My cute niece and nephew, who occasionally play the role of my minions in real life :).